

Hello, fellow food lovers! Chef Andrew here. Let’s talk about the single most common, most frustrating kitchen tragedy: the dry, tough, chewy baked chicken breast. It’s the reason so many people dread cooking chicken at home. You follow a recipe, you watch the clock, and yet you end up with something that’s a chore to eat.
Table of Contents
I am here today to tell you that it is not your fault. It’s the method. And today, we are going to change the way you bake chicken breasts forever.
I’m sharing my #1 fail-proof, professionally developed method that guarantees unbelievably juicy, tender, and flavorful baked chicken every single time. This isn’t just a recipe; it’s a masterclass in the simple science of cooking perfect chicken. We are going to make dry chicken a thing of the past. When you master this, you’ll be able to produce restaurant-quality chicken with absolute confidence.
Never Eat Dry Chicken Again: The #1 Fail-Proof Method to Bake Chicken Breasts
Equipment
- Baking Dish
- Meat Thermometer
- Meat Mallet
Ingredients
For the Chicken
- 4 boneless, skinless chicken breasts about 8 oz each
For the Quick Brine
- 4 cups water divided into 2 cups lukewarm and 2 cups cold
- 1/4 cup kosher salt
For Seasoning & Baking
- 1 tablespoon melted butter or olive oil
- 1 teaspoon kosher salt
- 1/2 teaspoon freshly-ground black pepper
- 1/2 teaspoon garlic powder
- 1/2 teaspoon smoked paprika
Instructions
- Quick Brine (The Moisture Secret): In a large bowl, dissolve ¼ cup kosher salt in 2 cups lukewarm water. Add 2 cups cold water. Submerge chicken breasts and let sit for 15 minutes. Remove, rinse with cold water, and pat completely dry.
- Prep for Baking: Preheat oven to 450°F (230°C). Pound chicken breasts to an even ¾-inch thickness. This is crucial for even cooking.
- Season the Chicken: Arrange chicken in a single layer in a metal or ceramic baking dish. Brush with melted butter or oil. In a small bowl, mix the 1 tsp salt, pepper, garlic powder, and paprika. Sprinkle evenly over all sides of the chicken.
- Bake: Bake for 15-18 minutes. The exact time depends on thickness, so use a meat thermometer. Chicken is done when the thickest part reaches 165°F (for best results, pull from oven at 160°F).
- Rest for Juiciness (Essential Step): Transfer chicken to a clean plate, tent loosely with foil, and let rest for 5-10 minutes before slicing. This allows the juices to redistribute, guaranteeing a moist result.
Notes
Chef’s Pro-Tips: The Fail-Proof Method
- Pounding is Key: An even thickness is the #1 secret to ensuring the entire breast cooks evenly without drying out.
- Trust the Thermometer: Cooking to temperature (165°F), not time, is the only way to guarantee perfectly cooked chicken. Pulling it at 160°F and letting it rest is the pro move.
- Don’t Skip the Rest: Slicing the chicken too early will cause all the precious juices to leak out. Be patient!
More Favorites from My Kitchen:
The #1 Fail-Proof One-Pan Cheesy Chicken and Rice (An Amazing 30-Minute Meal)
Never Eat Dry Chicken Again: The #1 Fail-Proof Air Fryer Chicken Breasts
Or go to my Pinterest.
The Holy Trinity: 3 Rules for Flawless Bake Chicken breasts
Perfectly juicy chicken isn’t about luck or some mythical secret ingredient. It’s about a simple, three-part technique. I call it the “Holy Trinity” of perfect chicken. If you follow these three rules, you cannot fail.
- Pound for Evenness: This is the most crucial, most overlooked step. A raw chicken breast is lopsided—thick on one end and thin on the other. If you bake it as is, the thin end becomes dry and stringy long before the thick end is cooked through. By pounding the breast to an even thickness, you ensure the entire piece cooks at the same rate. This is the foundation of edge-to-edge juiciness.
- Brine for Moisture: This is the true game-changer. Brining is simply soaking the chicken in a saltwater solution. The salt works scientifically to change the chicken’s muscle fibers, allowing them to absorb more moisture and, more importantly, to hold onto that moisture during the heat of baking. Even a quick 15-minute brine, which I call a “spa treatment” for the chicken, makes a world of difference. It seasons the meat from the inside out and is your insurance policy against dryness.
- Roast High & Rest Well: Forget low and slow. We want to cook the chicken at a high temperature (450°F). This roasts the outside quickly, creating a beautiful golden-brown crust and locking in the juices before the inside has a chance to overcook. Just as important is the rest after baking. Letting the chicken rest for 5-10 minutes allows the juices to settle and redistribute throughout the meat. Slice it too soon, and all that moisture will spill right out onto your cutting board.
This three-step method is your new blueprint. It’s simple, it’s scientific, and it’s how you will bake chicken breasts perfectly for the rest of your life.
The Building Blocks of a Perfect Meal “bake chicken breasts“
Our seasoning blend is simple but powerful, designed to create a savory, smoky crust that everyone will love.
- The Chicken: Use boneless, skinless chicken breasts, about 8oz each.
- The Brine: A simple mixture of lukewarm water and kosher salt.
- The Fat: Melted butter or olive oil. Butter provides a richer flavor and helps with browning, while olive oil is a great, healthy alternative.
- The Seasoning: A classic blend of kosher salt, black pepper, garlic powder, and smoked paprika for a beautiful color and smoky depth.
Ingredients for the Juiciest Baked Chicken Ever
(A clear, simple list makes the process feel easy and achievable.)
- 4 boneless, skinless chicken breasts (about 8 oz each)
- For the Brine: 4 cups water, ¼ cup kosher salt
- 1 tablespoon melted butter or olive oil
- 1 teaspoon kosher salt
- ½ teaspoon freshly-ground black pepper
- ½ teaspoon garlic powder
- ½ teaspoon smoked paprika
Step-by-Step Instructions to a Flawless Result of Bake Chicken Breasts
Follow these steps with care, and I promise you will be amazed at the results.
Step 1: The Quick Brine “Spa Treatment”
First, let’s make sure your chicken hasn’t already been pre-brined (check the packaging for “contains up to X% sodium solution”). If it has, you can skip this step.
In a large bowl, stir ¼ cup of kosher salt into 2 cups of lukewarm water until the salt mostly dissolves. Add 2 cups of cold water to cool the mixture down. Place your chicken breasts in the brine, ensuring they are fully submerged. Let them soak for just 15 minutes. For even better results, you can cover and refrigerate them for up to 6 hours.
Remove the chicken from the brine, rinse with cold water, and pat them completely dry with paper towels.
Step 2: Pound, Season, and Prepare for Baking
Preheat your oven to a blazing 450°F (230°C).
Place a chicken breast on a cutting board, cover with plastic wrap, and gently pound the thicker end until the entire breast is an even ¾-inch thickness. Repeat with the remaining breasts.
Arrange the chicken in a single layer in a metal baking pan or a ceramic baking dish. Brush both sides evenly with melted butter or olive oil. In a small bowl, whisk together the 1 teaspoon of kosher salt, pepper, garlic powder, and smoked paprika. Sprinkle this seasoning mixture evenly over all sides of the chicken.
Step 3: High-Heat Baking
Place the chicken in the preheated oven and bake for 15-18 minutes. The exact time will depend on the thickness of your chicken. This is where a meat thermometer is your best friend. The chicken is done when the thickest part registers 165°F. For the juiciest possible result, I pull my chicken out at 160°F.
Step 4: The Crucial Rest
Immediately transfer the cooked chicken to a clean plate or cutting board. Tent loosely with foil and let it rest for 5-10 minutes. During this time, carryover cooking will bring the internal temperature up to a safe 165°F, and the juices will redistribute, ensuring a moist, tender bite. Do not skip this step!
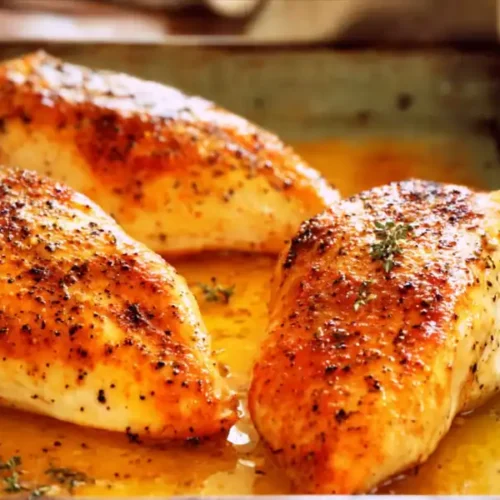
After resting, slice and serve your perfectly juicy baked chicken breast.

Frequently Asked Questions (FAQ) of Bake Chicken Breasts
Let’s tackle the most common questions about how to bake chicken breasts.
How long should you Cook chicken breast in the oven?
The time depends on temperature and thickness. For an average breast pounded to ¾-inch thickness, it will take about 15-20 minutes at 425°F-450°F, or 20-25 minutes at 400°F. Always cook to an internal temperature of 165°F, not to time.
Is it better to Bake Chicken breasts at 350 or 400?
It is better to bake chicken breasts at 400°F (or higher). The high heat cooks the chicken quickly, searing the outside and locking in juices before they have a chance to evaporate. A lower temperature like 350°F requires a longer cook time, which increases the risk of drying out the chicken.
How to bake chicken breasts and keep it juicy? / How to bake chicken breasts without drying it out?
These two questions have the same three-part answer—my “Holy Trinity” method: 1) Pound the chicken to an even thickness for even cooking. 2) Brine the chicken for at least 15 minutes to help it retain moisture. 3) Cook at high heat (400°F+) and use a meat thermometer to pull it out at 160°F, then let it rest for 5-10 minutes.
Do you Cook chicken at 180 or 200?
Assuming these are Celsius temperatures, you should cook chicken at 200°C (which is 400°F) or even higher. 180°C (350°F) works, but 200°C is better for ensuring a juicy result with a beautiful golden crust.
How long to cook chicken breast in the oven at 200C?
At 200°C (400°F), an average-sized bake chicken breasts pounded to an even thickness will take approximately 20-25 minutes to cook through. Start checking the internal temperature after 18 minutes to be safe.
Final Thoughts from the Chef
And there you have it—the blueprint for banishing dry chicken from your kitchen forever. My goal today wasn’t just to give you a recipe, but to share a method—a foolproof system that puts you in complete control. By understanding the “why” behind pounding, brining, and resting, you’ve unlocked the secret to perfect results, every single time.
Think of this as your new foundation. This is the perfect chicken for slicing over salads, shredding for tacos, or dicing into pasta. You’re no longer just “making a recipe”; you’re mastering a core kitchen skill that will serve you for years to come.
I am genuinely excited for you to try this method and see the incredible difference it makes. When you do, please come back and leave a comment below. Let me know how it turned out! Your success stories are what make this all worthwhile.
Happy cooking