

Hello, my friends! Chef Andrew here. Let’s have an honest conversation about boneless, skinless chicken breast. It’s the go-to protein for healthy eating, but it is also the most feared. We’ve all been there: you cook it with the best intentions, but you end up with something that’s dry, tough, stringy, and just plain sad. It’s the reason so many people say they hate chicken breast.
Table of Contents
Well, I’m here today to tell you that it’s not your fault. It’s the method. And today, we are going to fix that forever.
I’m sharing my #1 fail-proof, professionally developed method for the juiciest, most tender, most flavorful air fryer chicken breasts you will ever make. This isn’t just a recipe with a list of ingredients; this is a masterclass in the science of cooking perfect chicken. We are going to banish dry chicken from your kitchen for good. This method is so reliable, you’ll feel like a kitchen superhero every single time.
Never Eat Dry Chicken Again: The #1 Fail-Proof Air Fryer Chicken Breasts
Equipment
- Air Fryer
- Instant-read thermometer
- Meat Mallet
Ingredients
- 2 boneless, skinless chicken breasts 6-8 oz each
- 0.5 teaspoon kosher salt for dry brining
- 2 teaspoons extra-virgin olive oil
For the Spice Rub
- 1 teaspoon paprika smoked paprika recommended
- 0.5 teaspoon garlic powder
- 0.5 teaspoon onion powder
- 0.25 teaspoon ground black pepper
Instructions
- Pound for Evenness: Place chicken breasts on a cutting board, cover with plastic wrap, and pound the thicker end until the entire breast is an even ¾-inch thickness. This is the most crucial step.
- Dry Brine for Moisture: Sprinkle the chicken all over with kosher salt. Place on a plate, uncovered, in the refrigerator for at least 30 minutes.
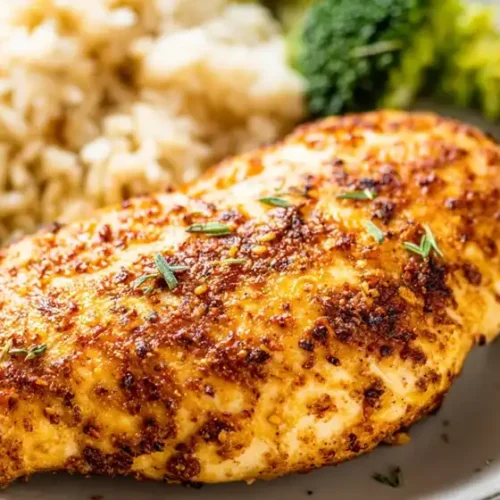
- Season the Chicken: In a small bowl, mix paprika, garlic powder, onion powder, and pepper. Drizzle the chicken with olive oil, then rub the spice mixture evenly over all sides.
- Air Fry: Preheat air fryer to 375°F (190°C). Place chicken in the basket, smooth-side down. Cook for 6 minutes.
- Flip and Finish: Flip the chicken. Continue cooking for 2-8 more minutes, or until an instant-read thermometer registers 155-160°F. Do not overcook.
- Rest for Juiciness: Immediately transfer chicken to a clean plate, cover loosely with foil, and let rest for 5-10 minutes before slicing. The chicken will continue to cook to a safe 165°F. This step is essential.
Notes
Chef’s Pro-Tips
- Pounding Evenly is Non-Negotiable: This ensures the chicken cooks at the same rate, preventing one end from drying out while the other is still raw. It’s the #1 key to juicy chicken.
- Trust the Thermometer, Not the Clock: Every air fryer and chicken breast is different. Pulling the chicken out at 155-160°F and letting it rest is the secret to a perfectly cooked, moist result.
- Storage & Reheating: Store leftovers in an airtight container in the fridge for up to 4 days. Reheat gently in the air fryer at 350°F until warm.
More Favorites from My Kitchen:
Say Goodbye to Bland Dinners: The #1 Grilled Chicken and Broccoli Bowl
The #1 Secret to an Amazing Chicken Sausages with Zucchini, and Tomato Pasta
Or go to my Pinterest.
The Holy Trinity: 3 Non-Negotiable Rules for Juicy Air Fryer Chicken Breasts
Forget everything you think you know. Perfect, juicy Air Fryer Chicken Breasts isn’t about a magical seasoning blend or a specific brand of air fryer. It comes down to three foundational principles—what I call the “Holy Trinity” of perfect chicken. Master these, and you will never eat dry chicken again.
- Pound for Evenness: This is the single most important, most overlooked step. A chicken breast is naturally teardrop-shaped, with a thick end and a thin, tapered end. If you cook it as is, the thin end will be horribly overcooked and dry before the thick end is safe to eat. By pounding the breast to an even thickness (about ¾-inch), you guarantee that the entire piece of chicken cooks at the same rate. This is the #1 secret to edge-to-edge juiciness.
- Dry Brine for Moisture: This sounds fancy, but it’s incredibly simple. It’s just salting the chicken ahead of time. The salt draws moisture out of the chicken, dissolves into it, and then is reabsorbed back into the meat. This process not only seasons the chicken from the inside out but also changes the protein structures, helping them retain much more moisture during cooking. It’s a 30-minute step that yields a 10x better result.
- Rest for Juiciness: This is the final, crucial test of a cook’s patience. When you pull the chicken from the hot air fryer, the juices are bouncing around like crazy. If you slice into it immediately, all that precious moisture will pour out onto your cutting board. Letting the chicken rest for 5-10 minutes allows the muscle fibers to relax and reabsorb that juice, ensuring every slice is perfectly moist.
This three-step method is the foundation for perfect air fryer chicken breasts. It is simple, it is scientific, and it is foolproof.
Ingredients for the Juiciest air fryer chicken breasts of Your Life
Our seasoning blend is a classic, smoky, savory mix that complements the chicken beautifully.
- 2 boneless, skinless chicken breasts (about 6-8 oz each)
- ½ teaspoon kosher salt (for the dry brine)
- 2 teaspoons extra-virgin olive oil
- 1 teaspoon paprika (use smoked paprika for extra flavor)
- ½ teaspoon garlic powder
- ½ teaspoon onion powder
- ¼ teaspoon ground black pepper
Step-by-Step Instructions to a Flawless Result of air fryer chicken breasts
Follow these steps precisely, and I guarantee you will be amazed at the difference.
Step 1: Pound for Even Thickness
Place a chicken breast on a cutting board and cover it with a piece of plastic wrap. Using a meat mallet, the bottom of a heavy pan, or even your palm, gently pound the thicker end of the breast until the entire piece is an even ¾-inch thickness. Repeat with the second breast. This is the most important step for perfect air fryer chicken breasts.
Step 2: The 30-Minute Dry Brine
Pat the chicken breasts dry with a paper towel. Sprinkle all sides evenly with the ½ teaspoon of kosher salt. Place them on a plate, uncovered, and refrigerate for at least 30 minutes or up to a day. This is your insurance policy for moist, flavorful meat.
Step 3: Season for Perfection
When you’re ready to cook, remove the chicken from the fridge and let it sit at room temperature for about 15 minutes. In a small bowl, mix together the paprika, garlic powder, onion powder, and black pepper.
Place the chicken in a bowl and drizzle with the olive oil, tossing to coat. Sprinkle the spice mixture over the chicken and use your hands to rub it evenly into all the nooks and crannies.
Step 4: The Air Frying Process
Preheat your air fryer to 375°F (190°C). Once hot, place the chicken breasts in the air fryer basket in a single layer, smooth-side down.
Air fry for 6 minutes. Then, pull out the basket and, using tongs, carefully flip the chicken breasts over.
Continue to cook for another 2 to 8 minutes. The exact time will depend entirely on the size of your chicken and your air fryer model. Start checking the internal temperature after 2 minutes on the second side. You want to pull the chicken out when it reaches 155-160°F on an instant-read thermometer. Do not overcook it!

Step 5: The All-Important Rest for air fryer chicken breasts
Immediately transfer the cooked chicken to a clean plate or cutting board. Tent it loosely with foil and let it rest for 5 to 10 minutes. During this time, carryover cooking will bring the internal temperature up to the perfectly safe 165°F, and the juices will redistribute throughout the meat.
After resting, slice the chicken against the grain and marvel at how juicy and tender it is. You have just made perfect air fryer chicken breasts.

Frequently Asked Questions (FAQ) of Air Fryer Chicken Breasts
Let’s tackle the most common questions to ensure your success.
How long do I cook chicken breast in the air fryer?
The time varies greatly based on thickness, but for a breast pounded to an even ¾-inch at 375°F, it typically takes 8-14 minutes total, flipping halfway through. Always rely on an instant-read thermometer, not the clock.
How to cook chicken breast in air fryer without drying it out?
By following the “Holy Trinity” method outlined in this article: 1) Pound it to an even thickness, 2) Dry brine it with salt for at least 30 minutes, and 3) Let it rest for 5-10 minutes after cooking before slicing.
How long should you air fryer chicken breasts at 375 degrees?
For ¾-inch thick breasts, the total time is usually 8-14 minutes. I recommend cooking for 6 minutes, flipping, and then cooking for another 2-8 minutes until the internal temperature reaches 155-160°F.
Should you put raw chicken in an air fryer?
Yes, absolutely! The air fryer is designed to cook raw foods, including chicken. It circulates hot air around the chicken to cook it through and give it a beautiful, roasted exterior.
How long to cook “air fryer chicken breasts” in air fryer at 180 degrees?
Cooking at 180°F (which is about 82°C) is very low and not recommended for chicken breasts, as it would take a very long time and could result in a rubbery texture. Stick to higher temperatures like 375°F-400°F for the best results.
How do you keep chicken breast from drying out in an air fryer?
The #1 way is to pound the chicken to an even thickness to ensure it cooks evenly. The #2 way is to use a meat thermometer and pull the chicken out when it hits 155-160°F, then let it rest. These two steps will prevent dry chicken more than anything else.
Final Thoughts from the Chef
So there you have it. The end of dry chicken as we know it. This isn’t just another recipe for air fryer chicken breasts; it’s a new beginning for your relationship with this incredibly versatile, lean protein.
My goal today was to give you more than just instructions—it was to give you a foolproof method. By embracing the “Holy Trinity” of pounding for evenness, brining for moisture, and resting for juiciness, you have unlocked the secret to a perfect result, every single time. You can now cook with confidence, knowing that you have the technique to transform a simple chicken breast into something truly special.
Think of all the amazing meals ahead: the perfect chicken for slicing over salads, shredding for tacos, or dicing into pasta. This reliable method is your foundation for countless quick and healthy dinners.
I am genuinely excited for you to try this and experience that “aha!” moment. When you do, please come back and leave a comment below. I would love to hear about your success and how you used your perfectly cooked chicken!
Happy cooking