
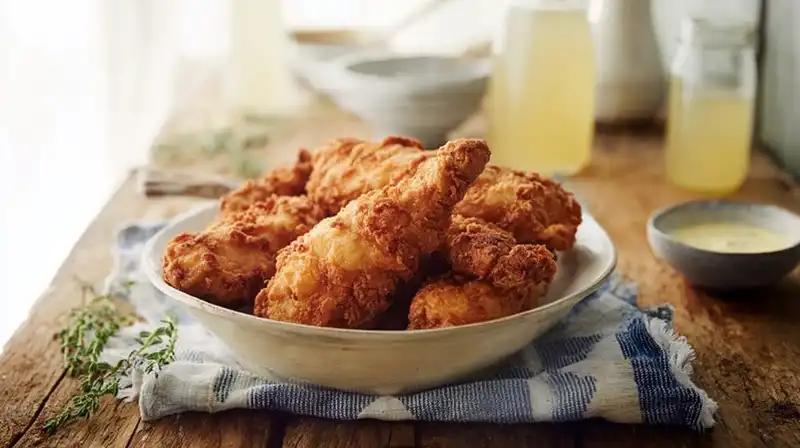
Introduction of Buttermilk Chicken
Buttermilk Chicken is what comfort food dreams are made of. Tender, juicy on the inside, perfectly crisp on the outside, and bursting with flavor from edge to edge. If you have ever taken a bite of fried chicken that melted in your mouth while still delivering that golden crunch, there is a good chance buttermilk had something to do with it.
Table of Contents
As a chef, I have tested countless marinades, coatings, and cooking methods. Nothing delivers results as consistently delicious as a buttermilk soak. It is more than just tradition. It is culinary science at work. The natural acidity of buttermilk gently tenderizes the chicken while allowing the seasoning to penetrate deep into every bite. That same soak helps the breading cling beautifully so your final result is both crispy and full of flavor.
Whether you are planning a cozy family dinner, a game-day platter, or a weekend indulgence, this recipe belongs in your rotation. It is simple enough for weeknights but special enough to steal the show at gatherings.
This guide will walk you through each step clearly and confidently. From preparing the marinade to frying with perfect timing, I will show you exactly how to make buttermilk chicken that rivals your favorite restaurant. Let’s dive in and make something unforgettable together.
Buttermilk Chicken Made Easy in 3 Irresistible Phases
Ingredients
For the Marinade
- 2 pounds chicken tenderloins
- 1 cup buttermilk
- 1.5 teaspoons salt
- 0.25 teaspoon cayenne pepper
- 0.25 teaspoon garlic powder
- 0.25 teaspoon paprika
For the Breading
- 1.5 cups all-purpose flour
- 1.5 teaspoons baking powder
- 1 heaping teaspoon salt
- 0.75 teaspoon black pepper
- 0.75 teaspoon garlic powder
- 0.75 teaspoon paprika
- 3 tablespoons buttermilk
For Cooking
- 3-4 cups vegetable oil for frying
Instructions
- In a large sealable bag, combine chicken tenderloins with buttermilk, salt, cayenne, garlic powder, and paprika. Seal and refrigerate for at least 4 hours or overnight.
- In a separate large bowl, whisk flour, baking powder, salt, pepper, garlic powder, and paprika. Stir in buttermilk to form crumbly clumps.
- Remove chicken from marinade. Dredge each tender in the breading mixture, pressing to ensure it sticks. Place breaded tenders on a lined baking sheet.
- In a large heavy-bottomed pot, heat oil over medium-high to 350°F. Fry chicken tenders in batches, flipping once, until golden and cooked through. Drain on paper towels.
- Serve hot with your favorite dipping sauce or side dishes.
Notes
More Recipes You Might Enjoy:
Tomato Burrata Salad in 3 Easy Moves to Impress
Slow Cooker Brown Sugar Garlic Chicken Made Easy with 3 Ingredients
Or go to my Pinterest.
Why You’ll Love This Recipe “Buttermilk Chicken”
This buttermilk chicken recipe isn’t just another fried chicken method. It is the one you will keep coming back to. The results are consistently juicy, beautifully seasoned, and satisfyingly crisp. Here’s why it deserves a permanent place in your kitchen.
• Incredibly tender and juicy thanks to the buttermilk marinade
• Crispy, golden coating that holds up after every bite
• Easy to follow with no fancy equipment required
• Perfect for weekend dinners, family cookouts, or casual entertaining
• Versatile recipe that works great for frying, baking, or even air frying
• Rich, Southern-inspired flavor that delivers every time
• Crowd-pleaser that kids and adults always enjoy
What sets this version apart is the way each step is designed to maximize both flavor and texture. The marinade does more than just tenderize. It infuses the chicken with seasoning from the inside out. The breading is clumpy in all the right ways, giving you that signature crunchy crust. And the cooking method is tailored to help you fry with confidence, no guesswork needed.
There is also a nostalgic comfort in biting into something that tastes homemade but with the polish of restaurant-level quality. This buttermilk chicken hits that sweet spot. It is hearty, satisfying, and built to impress without being complicated. One taste and you will understand why it is worth every step.
Ingredients Needed for Buttermilk Chicken
Before you begin, gather your ingredients and give yourself a head start by marinating the chicken early. Each component in this recipe plays a specific role in building layers of flavor and texture. Here’s what you’ll need.
For the Marinade
• 2 pounds of chicken tenderloins
(Boneless and skinless for easy frying and even cooking)
• 1 cup of buttermilk
(Full-fat buttermilk is best for tenderizing and coating retention)
• 1½ teaspoons of salt
(Seasoning from the inside out begins here)
• ¼ teaspoon of cayenne pepper
(Adds subtle warmth without overpowering the flavor)
• ¼ teaspoon of garlic powder
(Provides a savory, well-rounded depth)
• ¼ teaspoon of paprika
(Gives the chicken a gentle smokiness and color)
For the Breading
• 1½ cups of all-purpose flour
(The base of a crispy, classic crust)
• 1½ teaspoons of baking powder
(Adds lift to the coating for that craggy texture)
• 1 heaping teaspoon of salt
(Ensures every bite of crust is properly seasoned)
• ¾ teaspoon of black pepper
(Sharpens the flavor of the coating)
• ¾ teaspoon of garlic powder
(Reinforces the savory notes of the marinade)
• ¾ teaspoon of paprika
(Helps develop that golden color while building flavor)
• 3 tablespoons of buttermilk
(Creates a clumpy, textured breading that crisps up beautifully)
For Cooking
• 3 to 4 cups of vegetable oil
(Enough to create a shallow fry with even heat retention; use canola or peanut oil for best results)
With these simple pantry staples and a little preparation, you’ll be on your way to perfectly fried buttermilk chicken that’s crispy on the outside and unbelievably juicy on the inside.
How to Make Buttermilk Chicken
Follow these step-by-step instructions to make crispy, juicy buttermilk chicken that delivers big flavor and irresistible texture.
1. Marinate the Chicken
Place the chicken tenderloins in a large zip-top bag. In a bowl, whisk together the buttermilk, salt, cayenne pepper, garlic powder, and paprika. Pour this mixture over the chicken, seal the bag tightly, and gently massage to coat all the pieces. Set the bag in a bowl (to catch leaks, if any) and refrigerate for at least 4 hours. For deeper flavor and better tenderness, let it sit overnight.
2. Prepare the Breading
In a large bowl, whisk together the flour, baking powder, salt, black pepper, garlic powder, and paprika. Drizzle in the buttermilk and use a fork to stir just until the mixture forms small clumps. These bits will stick to the chicken and create a beautifully crunchy coating.
3. Dredge the Chicken
Line a baking sheet with foil or parchment paper. Remove a few chicken tenders at a time from the marinade, allowing excess liquid to drip off. Press each tender firmly into the breading, coating all sides. The more clumps that stick, the crunchier your final result. Use one hand for wet and one for dry to keep things clean and effective.
4. Heat the Oil
Pour about three-quarters of an inch of vegetable oil into a deep, heavy-bottomed skillet or Dutch oven. Heat over medium-high until shimmering. To test if it is ready, drop in a small cube of bread. If it sizzles and browns, the oil is hot enough (around 350°F).

5. Fry in Batches
Using tongs, carefully place a few tenders into the hot oil. Avoid overcrowding to keep the temperature stable. Fry each piece for about 3 minutes per side, or until golden and crisp. Remove and place on a paper towel-lined tray to drain excess oil. Repeat with remaining tenders, adjusting the heat as needed to prevent over-browning.
6. Check for Doneness
When the chicken is golden and crisp, you can pull one piece out and check the color against the paper towel. It may appear lightly golden in the oil but will show its true shade once drained.
7. Optional Freezing Instructions
Once cooled, the cooked tenders can be frozen in an airtight container for up to 3 months. To reheat, place them on a wire rack over a baking sheet and warm in a 350°F oven for 20 to 25 minutes, flipping halfway through until crisp and heated through.
Now you are ready to enjoy restaurant-worthy buttermilk chicken straight from your kitchen. Serve hot and get ready for the compliments.

Serving and Storage Tips of Buttermilk Chicken
Serving Suggestions
Buttermilk chicken shines on its own, but pairing it with the right sides elevates the experience. Here are a few ways to serve it:
• Arrange the tenders on a platter with fresh lemon wedges and chopped parsley for a vibrant finish.
• Serve with homemade coleslaw, buttery cornbread, or mashed potatoes for a hearty Southern-style meal.
• Create a crispy chicken sandwich by layering tenders in a toasted brioche bun with pickles and your favorite sauce.
• For a game-day spread, serve with a variety of dipping sauces like ranch, honey mustard, or spicy aioli.
Storage Instructions
To keep leftovers tasting fresh:
• Place cooled chicken tenders in an airtight container and refrigerate for up to 4 days.
• For longer storage, freeze the cooked tenders on a baking sheet until solid, then transfer to a freezer-safe container or zip-top bag. They’ll keep well for up to 3 months.
Reheating Tips
To maintain the crispy texture:
• Reheat refrigerated tenders in a preheated oven at 375°F on a wire rack set over a baking sheet. Warm for 10 to 12 minutes until heated through and crisp.
• For frozen tenders, bake directly from frozen at 350°F for about 25 minutes, flipping halfway through. Avoid microwaving as it may soften the breading.
With these tips, your buttermilk chicken will taste just as amazing the next day as it did fresh from the pan.
Helpful Notes of Buttermilk Chicken
• Marinate for Maximum Flavor
While four hours in the marinade will do the trick, letting the chicken soak overnight will result in extra tender, deeply flavored meat. The acidity in the buttermilk helps break down proteins and infuses the chicken with subtle seasoning.
• Use a Thermometer if Needed
If you are unsure about oil temperature, use a kitchen thermometer to maintain the heat around 350°F. Too hot, and the crust will burn before the chicken cooks through. Too low, and the breading can become greasy.
• Double Dredge Option
For an ultra-thick and crispy crust, dredge the chicken in the flour mixture, return it to the marinade quickly, then dredge again. This creates an extra layer of cragginess.
• No Buttermilk? No Problem
You can make your own by adding 1 tablespoon of white vinegar or lemon juice to 1 cup of milk. Let it sit for 5 to 10 minutes before using.
• Gluten-Free Adaptation
Swap all-purpose flour with a 1-to-1 gluten-free blend to make the recipe celiac-friendly without sacrificing crunch.
• Oil Selection Matters
Use a neutral oil with a high smoke point like peanut, canola, or sunflower oil for consistent frying and flavor neutrality.
• Leftover Ideas
Turn extra tenders into wraps, sliders, or salads. They’re just as satisfying the next day with a fresh twist.
With just a few smart adjustments, this buttermilk chicken recipe becomes even more adaptable, making it a go-to favorite for weeknights or special occasions.
Conclusion of Buttermilk Chicken
If you have ever dreamed of mastering perfectly crispy and juicy fried chicken at home, this buttermilk chicken recipe is your golden opportunity. It combines the richness of a well-balanced marinade, a crunchy seasoned crust, and a deeply satisfying flavor in every bite. Whether you’re cooking for your family, hosting game night, or simply craving comfort food that delivers, this recipe has you covered.
What makes this buttermilk chicken a standout? The secret lies in the balance. The acidity of the buttermilk tenderizes the meat, while the seasoned flour coating ensures a crust that holds up with every crunchy bite. Unlike many fried chicken recipes that rely heavily on complex spices or multi-step processes, this version keeps it simple without sacrificing flavor.
This dish is more than just a dinner option — it is a centerpiece. Serve it fresh from the skillet with classic sides or pack it into sliders and wraps for the next day. No matter how you enjoy it, the satisfaction is the same.
If you gave this recipe a try, I would love to hear how it turned out. Please leave a star rating and comment below to share your experience. Did you make any tweaks? Add a new twist? Tell me how you served it.
Don’t forget to pin this recipe on Pinterest or share it with friends on Facebook. You never know who might need the perfect buttermilk chicken recipe in their life.
So, what are you waiting for? Grab that buttermilk, heat up your skillet, and let’s make something unforgettable.
Frequently Asked Questions
What does buttermilk do to chicken?
Buttermilk helps tenderize the chicken by breaking down proteins through its natural acidity. It also adds a subtle tang and helps the breading stick better, resulting in a crispier and more flavorful crust.
How long should you keep chicken in buttermilk?
For best results, marinate the chicken in buttermilk for at least 4 hours. If time allows, overnight marination (up to 24 hours) enhances flavor and tenderness even more.
What is the taste of buttermilk chicken?
Buttermilk chicken has a rich, savory taste with a slight tang from the marinade. The flavor is well-balanced with mild spice and a deliciously crispy texture from the seasoned breading.
Do you need to rinse buttermilk off chicken before frying?
No, you should not rinse the buttermilk off. Instead, allow any excess to drip off before breading. The buttermilk helps the coating adhere better and contributes to the final texture and flavor.
How to make buttermilk chicken?
To make buttermilk chicken, marinate chicken tenderloins in a seasoned buttermilk mixture, dredge them in a spiced flour coating, then fry until golden and crispy. Full step-by-step instructions are available in the recipe above.
How to make KFC coating?
KFC-style coating involves a blend of flour, baking powder, salt, black pepper, paprika, garlic powder, and other spices. To get the signature crunch, you can create clumps in the breading and double-dredge for extra texture before frying in hot oil.