

Creamy Mac and Cheese Quesadillas used to be one of those dishes I shied away from on busy nights, thinking it would be a hassle to make. But after finding a simple method that blends two of my favorite comfort foods, now it’s a go-to any day of the week! The best part? You can whip these up in no time, using whatever leftover mac and cheese you have on hand or just a few ingredients. Trust me, when you bite into that crispy tortilla with creamy cheese oozing out, you’ll see why it’s a favorite in my kitchen.
Recipe Card – Creamy Mac and Cheese Quesadillas

Creamy Mac and Cheese Quesadillas
Equipment
- Large Skillet
Ingredients
Ingredients
- 500 g Macaroni and cheese cooked and creamy
- 120 g Crispy bacon chopped
- 4 pcs Tortillas sturdy, for assembly
- 100 g Shredded cheese for extra melty goodness
- 15 ml Butter or oil for frying
Instructions
- Start by warming your mac and cheese filling so it's easy to spread. If you’re using bacon, make sure it’s crispy and finely chopped.
- Have your tortillas ready, and lightly oil or butter both sides to encourage browning.
- Spoon a nice layer of filling onto one tortilla, top with a little shredded cheese, and cover with a second tortilla to create a sandwich.
- Heat a wide skillet over medium heat and add a thin layer of oil or butter.
- Place your prepared quesadilla in the pan and cook until the bottom tortilla is golden and crispy, about 2–3 minutes.
- Carefully flip it and cook the other side until it's just as crispy and the cheese inside is gooey.
- Letting the quesadilla rest for a minute after cooking helps the cheese set a little, making it easier to slice.
Notes
More Favorites from My Kitchen:
Easy Vegetarian Lentil Meatballs Recipe
Creamy Mac and Cheese Quesadillas used to be one of those dishes I shied away from on busy nights, thinking it would be a hassle to make. But after finding a simple method that blends two of my favorite comfort foods, now it’s a go-to any day of the week! The best part? You can whip these up in no time, using whatever leftover mac and cheese you have on hand or just a few ingredients. Trust me, when you bite into that crispy tortilla with creamy cheese oozing out, you’ll see why it’s a favorite in my kitchen.
Recipe Card – Creamy Mac and Cheese Quesadillas
Creamy Mac and Cheese Quesadillas
Equipment
- Large Skillet
Ingredients
Ingredients
- 500 g Macaroni and cheese cooked and creamy
- 120 g Crispy bacon chopped
- 4 pcs Tortillas sturdy, for assembly
- 100 g Shredded cheese for extra melty goodness
- 15 ml Butter or oil for frying
Instructions
- Start by warming your mac and cheese filling so it's easy to spread. If you’re using bacon, make sure it’s crispy and finely chopped.
- Have your tortillas ready, and lightly oil or butter both sides to encourage browning.
- Spoon a nice layer of filling onto one tortilla, top with a little shredded cheese, and cover with a second tortilla to create a sandwich.
- Heat a wide skillet over medium heat and add a thin layer of oil or butter.
- Place your prepared quesadilla in the pan and cook until the bottom tortilla is golden and crispy, about 2–3 minutes.
- Carefully flip it and cook the other side until it's just as crispy and the cheese inside is gooey.
- Letting the quesadilla rest for a minute after cooking helps the cheese set a little, making it easier to slice.
Notes
More Favorites from My Kitchen:
Easy Vegetarian Lentil Meatballs Recipe
Sweet Potato & Lentil Shepherd’s Pie Recipe
Or go to my Pinterest.
What Are Creamy Mac and Cheese Quesadillas?
Why This Comfort Food Fusion Works
Creamy Mac and Cheese Quesadillas combine two favorites into a delightful handheld treat. The smooth, cheesy filling tucked inside a warm tortilla offers rich comfort and a satisfying crunch. You can easily adapt the flavors to your liking, from smoky bacon to fresh herbs, while keeping that wonderfully creamy texture that makes mac and cheese so inviting. Trust me, this fusion feels familiar yet new, like a handy meal you can enjoy anytime. The combination of creamy inside and crispy outside makes this dish perfect for busy weeknights or relaxed gatherings. Plus, you can adjust the filling based on what you have in your kitchen, making it a versatile and user-friendly option. Creamy, melty, and golden—this fun kitchen trick always brings smiles to the table. For such a simple recipe, it packs a big flavor punch.
Perfect for Leftover Makeovers
If you’ve got leftover macaroni and cheese lying around, this is your chance for a delicious makeover. Since the filling is already creamy, there’s no need to start from scratch—just scoop, spread, and seal it in a tortilla. Those leftovers transform into a crispy, fun new dish. It’s also a clever way to stretch a small serving into a snack or light meal you can share. Just warm the filling enough to spread easily, so your quesadilla seals well without any leaks. This approach minimizes waste and adds a playful twist to familiar leftovers. I’ve used this method countless times, and it always results in a warm, comforting bite that feels like a treat, not just reheated food.
Ingredients You’ll Need
Classic Version with Bacon
For the classic bacon version, you’ll need creamy macaroni and cheese folded into a tortilla, along with crispy bacon for extra flavor. Make sure you have cooked macaroni and cheese that’s well-seasoned, a few slices of crispy, chopped bacon, and some sturdy tortillas to hold everything together. A sprinkle of shredded cheese inside will add extra melty goodness, and a little butter or oil will help the tortilla get nice and crispy. Keep everything warm and close at hand to speed up the assembly. The combination of the savory bacon and creamy filling offers a comforting bite with a hint of richness. This crowd-pleaser still feels special.
Simplified 3-Ingredient Version
If you’re pressed for time or ingredients, the three-ingredient version makes it super simple: macaroni and cheese filling, shredded cheese, and tortillas. The goal here is to keep the filling creamy and easy to spread, so sealing the quesadilla is a breeze. This version shines when you want quick weeknight meals or need to please picky eaters who adore mac and cheese. The tortillas give structure, the cheese adds melty goodness, and the filling brings back that familiar comfort. It’s a straightforward approach that invites you to play around with your favorite cheese blend or a dash of pepper for a little kick. No fuss, just satisfaction.
Optional Add-Ins and Variations
Get creative with optional add-ins to personalize your Mac and Cheese Quesadillas. Fresh herbs like chives or parsley provide a fresh touch, while a sprinkle of onion or garlic powder enhances flavor. If you prefer some heat, toss in diced jalapeños or a splash of hot sauce; for a Southwest vibe, consider adding green chiles. You can also mix in breadcrumbs for a light crust or finish with a sprinkle of parmesan outside for a crispy finish. These add-ins let you adapt the dish to your family’s preferences or whatever ingredients you have on hand, keeping the concept flexible and approachable.
How to Make Mac and Cheese Quesadillas
Preparation Steps
Start by warming your mac and cheese filling so it’s easy to spread. If you’re using bacon, make sure it’s crispy and finely chopped. Have your tortillas ready, and lightly oil or butter both sides to encourage browning. Spoon a nice layer of filling onto one tortilla, top with a little shredded cheese, and cover with a second tortilla to create a sandwich. Press gently to compact, then set aside while you heat up your skillet. This prep keeps things running smoothly and speeds up assembly when you’re ready to cook. Remember, the aim is a cohesive pocket of creamy filling with a crispy exterior.
Stovetop Cooking Method
Heat a wide skillet over medium heat and add a thin layer of oil or butter. Place your prepared quesadilla in the pan and cook until the bottom tortilla is golden and crispy, about 2–3 minutes. Carefully flip it and cook the other side until it’s just as crispy and the cheese inside is gooey. If the filling starts to brown too fast, don’t hesitate to lower the heat a bit. Letting the quesadilla rest for a minute after cooking helps the cheese set a little, making it easier to slice. This method gives you a warm, melty center with a satisfying crunch.
Achieving Perfect Crispiness
To maximize crispiness, use a well-seasoned skillet or a nonstick pan, keeping the heat at medium. Don’t overstuff the filling—aim for a balanced layer that melts well without spilling out. A light coat of oil on the outside helps you achieve a shiny, crispy shell, while letting it rest briefly after cooking allows steam to escape and the cheese to settle. If the tortilla feels soggy, either cut back on the filling or cook it a little longer on lower heat to remove excess moisture. A well-sealed quesadilla that holds together when you slice it is worth that extra moment of patience.
Tips for Success
Layering Technique for Moisture Control
Layer the tortilla so the filling is evenly spread, with cheese inside the filling to hold everything together. Start by placing the bottom tortilla in the pan, adding the filling, and topping it with a light sprinkle of cheese before sealing with the second tortilla. Avoid overpacking; a snug, even layer helps prevent soggy centers and ensures the exterior crisps up nicely. If your filling seems too wet, pat it lightly with a paper towel before assembling to reduce moisture. This careful layering creates a neat, well-formed quesadilla instead of a messy collapse.
Common Mistakes to Avoid
Steer clear of overfilling, as this leads to leaks and uneven browning. Don’t rush the flip—let the bottom get nice and brown before turning it over. Cooking on too high heat can burn the outside while leaving the inside cold; keep it at a steady medium heat. If the cheese isn’t melting, cover the pan for a moment to trap some heat and help it melt. Lastly, don’t skip the resting time; a short pause helps the filling set and makes slicing cleaner. These little tips help keep your results consistent and delicious.
Time-Saving Shortcuts
Save some time by using pre-made macaroni and cheese, so all you need to do is reheat and assemble. Go for pre-shredded cheese blends for quick melting and easier grating. If you have leftovers, you can refrigerate the assembled quesadilla for a short while before cooking, making it easier on a busy night. A well-organized pre-assembly routine—filling, layering, and lining up all ingredients—makes weeknights feel calmer and so much more delicious.
Delicious Variations to Try
Spicy Jalapeño Version
If you want some heat, mix in finely chopped jalapeños or a few slices of pickled jalapeños. Adding pepper jack cheese gives it extra spice and creaminess. If you’re serving kids, you might want to deseed the peppers or use milder options to keep it approachable. The result is a creamy interior with a bright, spicy kick that balances the richness of the cheese. Adjust the amount based on your crowd’s preferences, and always taste as you go to get the right heat level.
Green Chile Southwest Style
Swap diced green chiles and a hint of cumin for a Southwest twist. If you like, add a bit of shredded chicken or black beans for extra protein and texture. This variation pairs well with a side of lime wedges and a simple avocado crema that brightens up the dish. The combination of creamy cheese, tangy chiles, and a warm tortilla turns this into a comforting, savory snack with a regional flair.
Parmesan Upgrade Option
Consider adding a Parmesan crust or mixing Parmesan into the filling for a sharper, nuttier flavor. A light sprinkle of Parmesan on the outside of the tortilla before cooking creates a subtle crust reminiscent of classic Italian cheese toasts. This simple change packs in big flavor without overshadowing the creamy filling. It’s a small tweak that really enhances the dish.
FAQ – Creamy Mac and Cheese Quesadillas
What can I do if the quesadilla turns out too soggy?
Next time, be sure not to overload it with filling. You can also let the quesadilla cook a bit longer over lower heat to crisp up the exterior without burning it. If it looks like it’s getting too moist, a quick blot with a paper towel before folding it up can help.
Can I make these quesadillas ahead of time?
Absolutely! You can assemble the quesadillas in advance and refrigerate them until you’re ready to cook. Just make sure to wrap them well. Reheat them in a skillet or toaster oven to keep that crispy texture.
What’s a good substitute for bacon if I want a vegetarian version?
Try using a richer cheese blend or adding some sautéed mushrooms or veggies for flavor. You can even use plant-based bacon if you’re looking for that smoky taste without the meat.
How do I store leftovers?
Store any leftover quesadillas in an airtight container in the fridge for up to 3 days. Reheat them gently in a skillet to enjoy that crispy exterior again.
What’s the best way to achieve maximum crispiness?
Use a well-seasoned skillet and keep the heat at medium. Lightly oil the tortilla’s exterior, and remember to let the quesadilla rest for a minute after cooking to remove excess steam!
Conclusion
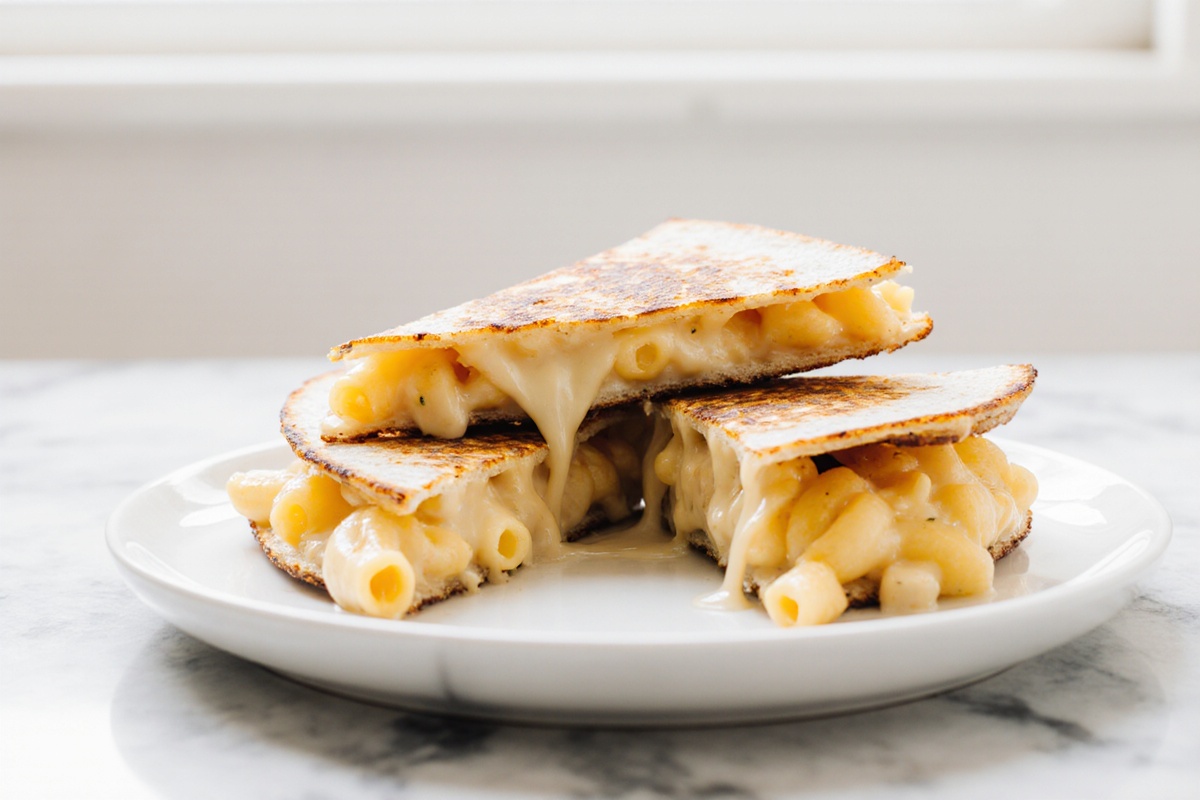
Once you cut into these Creamy Mac and Cheese Quesadillas, you’ll see the gooey, melted cheese stretch and catch the light. The aroma of crispy tortillas mingles with the rich scent of cheese, making it downright mouthwatering. The crunch of the outside meets that comforting, velvety inside, delivering pure satisfaction in every bite. I hope you give this recipe a shot—it’s simpler than you think and perfect for busy weeknights. Trust me, you’ll be pleasantly surprised at how easy it is to create something so delicious!
What Are Creamy Mac and Cheese Quesadillas?
Why This Comfort Food Fusion Works
Creamy Mac and Cheese Quesadillas combine two favorites into a delightful handheld treat. The smooth, cheesy filling tucked inside a warm tortilla offers rich comfort and a satisfying crunch. You can easily adapt the flavors to your liking, from smoky bacon to fresh herbs, while keeping that wonderfully creamy texture that makes mac and cheese so inviting. Trust me, this fusion feels familiar yet new, like a handy meal you can enjoy anytime. The combination of creamy inside and crispy outside makes this dish perfect for busy weeknights or relaxed gatherings. Plus, you can adjust the filling based on what you have in your kitchen, making it a versatile and user-friendly option. Creamy, melty, and golden—this fun kitchen trick always brings smiles to the table. For such a simple recipe, it packs a big flavor punch.
Perfect for Leftover Makeovers
If you’ve got leftover macaroni and cheese lying around, this is your chance for a delicious makeover. Since the filling is already creamy, there’s no need to start from scratch—just scoop, spread, and seal it in a tortilla. Those leftovers transform into a crispy, fun new dish. It’s also a clever way to stretch a small serving into a snack or light meal you can share. Just warm the filling enough to spread easily, so your quesadilla seals well without any leaks. This approach minimizes waste and adds a playful twist to familiar leftovers. I’ve used this method countless times, and it always results in a warm, comforting bite that feels like a treat, not just reheated food.
Ingredients You’ll Need
Classic Version with Bacon
For the classic bacon version, you’ll need creamy macaroni and cheese folded into a tortilla, along with crispy bacon for extra flavor. Make sure you have cooked macaroni and cheese that’s well-seasoned, a few slices of crispy, chopped bacon, and some sturdy tortillas to hold everything together. A sprinkle of shredded cheese inside will add extra melty goodness, and a little butter or oil will help the tortilla get nice and crispy. Keep everything warm and close at hand to speed up the assembly. The combination of the savory bacon and creamy filling offers a comforting bite with a hint of richness. This crowd-pleaser still feels special.
Simplified 3-Ingredient Version
If you’re pressed for time or ingredients, the three-ingredient version makes it super simple: macaroni and cheese filling, shredded cheese, and tortillas. The goal here is to keep the filling creamy and easy to spread, so sealing the quesadilla is a breeze. This version shines when you want quick weeknight meals or need to please picky eaters who adore mac and cheese. The tortillas give structure, the cheese adds melty goodness, and the filling brings back that familiar comfort. It’s a straightforward approach that invites you to play around with your favorite cheese blend or a dash of pepper for a little kick. No fuss, just satisfaction.
Optional Add-Ins and Variations
Get creative with optional add-ins to personalize your Mac and Cheese Quesadillas. Fresh herbs like chives or parsley provide a fresh touch, while a sprinkle of onion or garlic powder enhances flavor. If you prefer some heat, toss in diced jalapeños or a splash of hot sauce; for a Southwest vibe, consider adding green chiles. You can also mix in breadcrumbs for a light crust or finish with a sprinkle of parmesan outside for a crispy finish. These add-ins let you adapt the dish to your family’s preferences or whatever ingredients you have on hand, keeping the concept flexible and approachable.
How to Make Mac and Cheese Quesadillas
Preparation Steps
Start by warming your mac and cheese filling so it’s easy to spread. If you’re using bacon, make sure it’s crispy and finely chopped. Have your tortillas ready, and lightly oil or butter both sides to encourage browning. Spoon a nice layer of filling onto one tortilla, top with a little shredded cheese, and cover with a second tortilla to create a sandwich. Press gently to compact, then set aside while you heat up your skillet. This prep keeps things running smoothly and speeds up assembly when you’re ready to cook. Remember, the aim is a cohesive pocket of creamy filling with a crispy exterior.
Stovetop Cooking Method
Heat a wide skillet over medium heat and add a thin layer of oil or butter. Place your prepared quesadilla in the pan and cook until the bottom tortilla is golden and crispy, about 2–3 minutes. Carefully flip it and cook the other side until it’s just as crispy and the cheese inside is gooey. If the filling starts to brown too fast, don’t hesitate to lower the heat a bit. Letting the quesadilla rest for a minute after cooking helps the cheese set a little, making it easier to slice. This method gives you a warm, melty center with a satisfying crunch.
Achieving Perfect Crispiness
To maximize crispiness, use a well-seasoned skillet or a nonstick pan, keeping the heat at medium. Don’t overstuff the filling—aim for a balanced layer that melts well without spilling out. A light coat of oil on the outside helps you achieve a shiny, crispy shell, while letting it rest briefly after cooking allows steam to escape and the cheese to settle. If the tortilla feels soggy, either cut back on the filling or cook it a little longer on lower heat to remove excess moisture. A well-sealed quesadilla that holds together when you slice it is worth that extra moment of patience.
Tips for Success
Layering Technique for Moisture Control
Layer the tortilla so the filling is evenly spread, with cheese inside the filling to hold everything together. Start by placing the bottom tortilla in the pan, adding the filling, and topping it with a light sprinkle of cheese before sealing with the second tortilla. Avoid overpacking; a snug, even layer helps prevent soggy centers and ensures the exterior crisps up nicely. If your filling seems too wet, pat it lightly with a paper towel before assembling to reduce moisture. This careful layering creates a neat, well-formed quesadilla instead of a messy collapse.
Common Mistakes to Avoid
Steer clear of overfilling, as this leads to leaks and uneven browning. Don’t rush the flip—let the bottom get nice and brown before turning it over. Cooking on too high heat can burn the outside while leaving the inside cold; keep it at a steady medium heat. If the cheese isn’t melting, cover the pan for a moment to trap some heat and help it melt. Lastly, don’t skip the resting time; a short pause helps the filling set and makes slicing cleaner. These little tips help keep your results consistent and delicious.
Time-Saving Shortcuts
Save some time by using pre-made macaroni and cheese, so all you need to do is reheat and assemble. Go for pre-shredded cheese blends for quick melting and easier grating. If you have leftovers, you can refrigerate the assembled quesadilla for a short while before cooking, making it easier on a busy night. A well-organized pre-assembly routine—filling, layering, and lining up all ingredients—makes weeknights feel calmer and so much more delicious.
Delicious Variations to Try
Spicy Jalapeño Version
If you want some heat, mix in finely chopped jalapeños or a few slices of pickled jalapeños. Adding pepper jack cheese gives it extra spice and creaminess. If you’re serving kids, you might want to deseed the peppers or use milder options to keep it approachable. The result is a creamy interior with a bright, spicy kick that balances the richness of the cheese. Adjust the amount based on your crowd’s preferences, and always taste as you go to get the right heat level.
Green Chile Southwest Style
Swap diced green chiles and a hint of cumin for a Southwest twist. If you like, add a bit of shredded chicken or black beans for extra protein and texture. This variation pairs well with a side of lime wedges and a simple avocado crema that brightens up the dish. The combination of creamy cheese, tangy chiles, and a warm tortilla turns this into a comforting, savory snack with a regional flair.
Parmesan Upgrade Option
Consider adding a Parmesan crust or mixing Parmesan into the filling for a sharper, nuttier flavor. A light sprinkle of Parmesan on the outside of the tortilla before cooking creates a subtle crust reminiscent of classic Italian cheese toasts. This simple change packs in big flavor without overshadowing the creamy filling. It’s a small tweak that really enhances the dish.
FAQ – Creamy Mac and Cheese Quesadillas
What can I do if the quesadilla turns out too soggy?
Next time, be sure not to overload it with filling. You can also let the quesadilla cook a bit longer over lower heat to crisp up the exterior without burning it. If it looks like it’s getting too moist, a quick blot with a paper towel before folding it up can help.
Can I make these quesadillas ahead of time?
Absolutely! You can assemble the quesadillas in advance and refrigerate them until you’re ready to cook. Just make sure to wrap them well. Reheat them in a skillet or toaster oven to keep that crispy texture.
What’s a good substitute for bacon if I want a vegetarian version?
Try using a richer cheese blend or adding some sautéed mushrooms or veggies for flavor. You can even use plant-based bacon if you’re looking for that smoky taste without the meat.
How do I store leftovers?
Store any leftover quesadillas in an airtight container in the fridge for up to 3 days. Reheat them gently in a skillet to enjoy that crispy exterior again.
What’s the best way to achieve maximum crispiness?
Use a well-seasoned skillet and keep the heat at medium. Lightly oil the tortilla’s exterior, and remember to let the quesadilla rest for a minute after cooking to remove excess steam!
Conclusion
Once you cut into these Creamy Mac and Cheese Quesadillas, you’ll see the gooey, melted cheese stretch and catch the light. The aroma of crispy tortillas mingles with the rich scent of cheese, making it downright mouthwatering. The crunch of the outside meets that comforting, velvety inside, delivering pure satisfaction in every bite. I hope you give this recipe a shot—it’s simpler than you think and perfect for busy weeknights. Trust me, you’ll be pleasantly surprised at how easy it is to create something so delicious!